So, you've decided to build your own website with WordPress. After all, it's a great CMS that will allow you to create a stunning website in no time without any technical expertise.
Now comes the next step: setting it up on your hosting account.
If your host offers the CWP panel and you are unfamiliar with it, you might wonder how to go about installing WordPress. Well, the process is actually easier than you think.
This guide will walk you through how to install WordPress in CWP. We'll go through the process together, step by step.
No coding or SSH command line knowledge is required! Simply follow the instructions and helpful screenshots shared in this post. By the end of the guide, you'll have a functional WordPress website ready to customize and launch.
Let's dive in.
What You Need Before Getting Started
Before we install WordPress, let's ensure you have a few things ready. Make sure you have:
- Successfully pointed your domain name to the CWP server IP hosting your website: This step usually involves updating the nameservers in your domain registrar's DNS management section.
- Create a CWP end-user hosting account: You'll need one with hosting privileges.
If you are managing your own website, simply log into your CWP account using the details sent to your email when you signed up for hosting. However, If you're a reseller creating a managed hosting account for a client, log in to your CWP root admin panel first, then create a new user account.
To create a CWP User Account (if needed):
- 1. Navigate to User Accounts → New Account.
- 2. Fill in the required information, including the domain name, username, password, email address, and hosting package.
- 3. Click Create to establish the new user account.
- 4. Go to User Accounts → List Accounts, then click the link or tools icon (just below the username of the user you created) to open the CWP login page.
Steps on How to Install WordPress in CWP (With Softaculous)
Softaculous is a popular application installer tool pre-installed on all our CWP servers. It simplifies the installation process for various scripts, including WordPress. We'll leverage Softaculous to install WordPress in the following steps:
- 1. Log into CWP using your username and password. To access the CWP login page, use the details your host sent via email. Alternatively, enter the server IP address or domain followed by the 2083 port in your preferred browser. For example, https:192.168.100.1:2083 or yourdomain.com:2083.

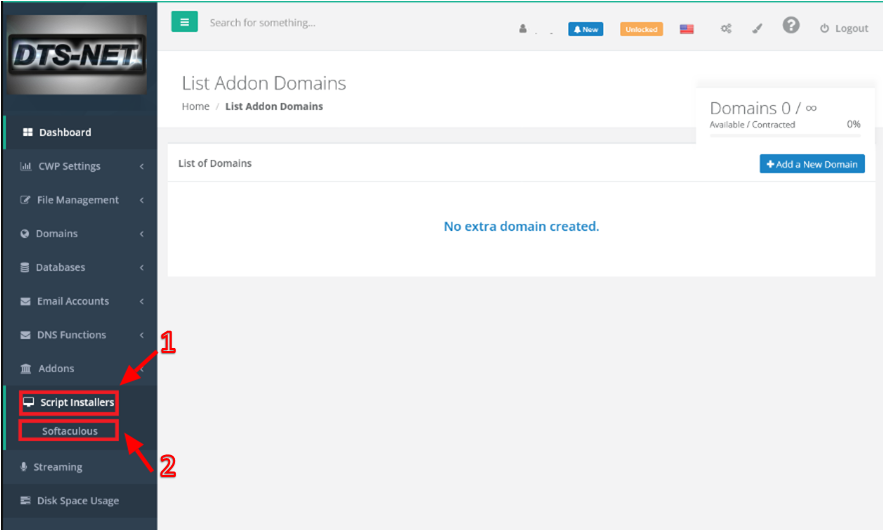
- 2. Once successfully logged into the CWP dashboard, go to Script Installers → Softaculous.
- 3. Locate the WordPress script from the list and click 'Install' to start the process.

-
4. Fill in the required information such as:
- Selecting the domain where you want to install WordPress
- Directory path that will contain the source code (leave this blank)
- A site title and description
- Your admin username and password to log into WordPress (Store these credentials securely for future use)
- Admin email address for WordPress login and notifications
- Preferred language and automated backups schedule
- The database user, database username, and table prefix (you can enter any text or leave it as default)

- 5. Once you've entered all the details, click the 'Install' button.
- 6. Wait for the installation process to complete in a few minutes.

- 7. Upon completion, you will receive a confirmation message that WordPress has successfully been installed along with links to your website and the admin login page.

- 8. Visit your website to verify the installation is complete and you will see the default WordPress sample home page.

- 9. To access your website's admin page, visit http://example.com/wp-login.php or https://example.com/wp-admin/ and log in with the username and password you set up earlier. (Remember to replace "example.com" with your actual domain name).

Over to You
So, there you have it. With this guide, figuring out how to install WordPress in CWP should be a breeze.
If you have any questions or experience issues during installation, send a support ticket to our technical team for assistance.
How to Install WordPress FAQs
To install the latest version of WordPress, your hosting environment needs to meet the following requirements:
- PHP Version: PHP 8.3 or greater is required. WordPress works best with the latest version of PHP.
- Database: MySQL version 8.0 or greater, or MariaDB version 10.6 or greater. WordPress can also work with other database systems, but these two are the most common.
- HTTPS Support: For security reasons, it is strongly recommended to use HTTPS.
- Web Server: Apache or Nginx are the most robust options for running WordPress, but any server that supports PHP and MySQL will do.
Keep in mind that WordPress system requirements change regularly, so make sure to stay updated on the latest specifications.
Yes, WordPress is open-source software, meaning it is free to download, install, use, and modify. However, you will need web hosting to run WordPress on your own domain.
Choosing a WordPress theme depends on your website's purpose, design preferences, and functionality needs. Look for themes that are responsive, SEO-friendly, regularly updated, and compatible with popular plugins. For more detailed guidance, check out our guide on choosing a WordPress theme.
WordPress plugins are add-ons that extend the functionality of your WordPress site. You can install plugins directly from the WordPress repository or upload them manually. Always choose plugins that are reputable, regularly updated, and compatible with your WordPress version.
Securing your WordPress site involves several steps, such as using strong passwords, keeping WordPress core, themes, and plugins updated, installing a security plugin that has 2FA, enabling HTTPS, limiting login attempts, and regularly backing up your site. For detailed tips on how to keep your site in great shape and iron clad, check out our guide on improving WordPress site health.
If you encounter the error "Required MARIADB version greater than or equal to 10.5.0 AND found version is: 10.2.44" while trying to install WordPress, you can resolve it by following these steps:
- 1. Choose a Lower Version of WordPress: Instead of installing the latest version of WordPress, select an older version that is compatible with MariaDB 10.4.34, such as WordPress 6.0.
- 2. Install WordPress: Proceed with the installation of the selected lower version using Softaculous or any other installer provided by your hosting service.
- 3. Update WordPress: Once the installation is complete, log in to your WordPress dashboard. Navigate to Dashboard > Updates and update to the latest version of WordPress.
By following these steps, you can successfully install WordPress despite the MariaDB version compatibility issue and ensure you are running the latest version of WordPress afterward.
Caveat:
If you are not comfortable performing these steps, it is recommended to contact your hosting provider for assistance. They can help ensure the installation process is completed correctly and securely.